Sunday, November 04, 2007

Better Is Not Always Best...


The original shot; 916 views, 59 faves and 20 comments in a week on Flickr

Interesting quandary this week; last Friday I loaded the above shot on to Flickr. It was just a quick joke thing, shot on my Canon compact, up it loaded and then on to other stuff. Despite a busy week it did niggle the anal part of my brain that I'd not quite got it right though; the highlights on the figures are badly blown.
After a day or so I got round to re-shooting on my SLR (whose bigger sensor copes better with contrast) and then it took the rest of the week before I got round to getting the shot off the camera. Normally, when I make a technical improvement, I'd just replace a shot on Flickr, but in the meantime the original shot had garnered 916 views (2nd highest ever on my stream), 59 faves (highest ever on my stream) and 20 comments (2nd highest ever on my stream).


Revised version with better contrast control

I decided that, since the original had been so popular, and the new one had slightly different framing, it would be "cheating" to just replace it; besides, just because I prefer the low-contrast version doesn't mean my "readership" of 59 "favers" would think so. In the end I've uploaded both to my Flickr stream and linked the two so that people can see the differences.

Monday, October 08, 2007

E550 Extension Lenses

E550 Cybermen

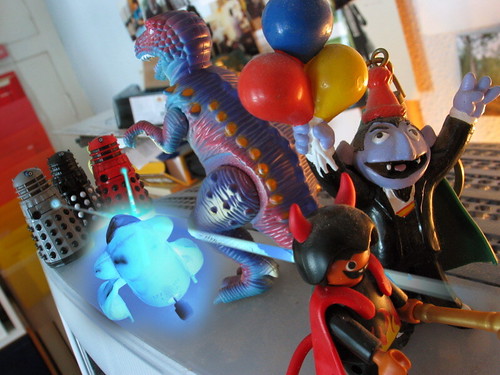
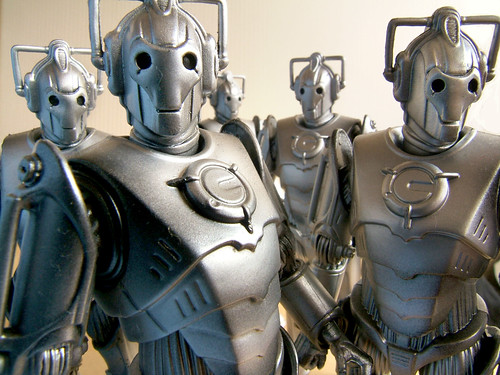
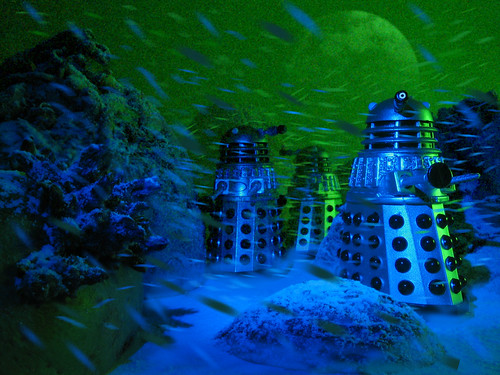
5" Cyberman figures photographed with Finepix E550 and Fujifilm 0.76x Wide Conversion Lens WL-FXE01

Back in the summer I picked up an extension lens set for my Fuji Finepix E550; this comprises the Fujifilm Adaptor Ring AR-FXE02, that bayonets around the E550's lens, and has a 43mm screw thread that allows the
Fujifilm 0.76x Wide Conversion Lens WL-FXE01 or Fujifilm 1.92x Tele Conversion Lens TL-FXE01 to be fitted. 43mm filters can also be attached to the adaptor.

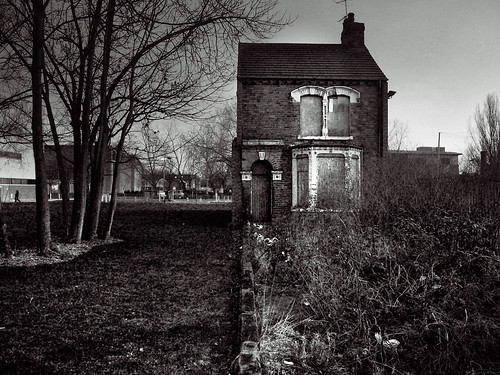
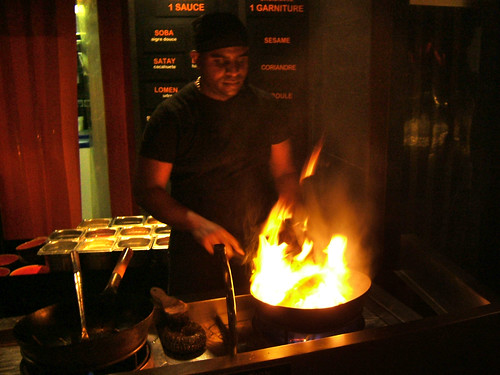
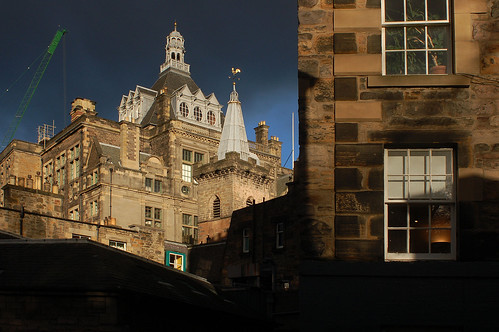
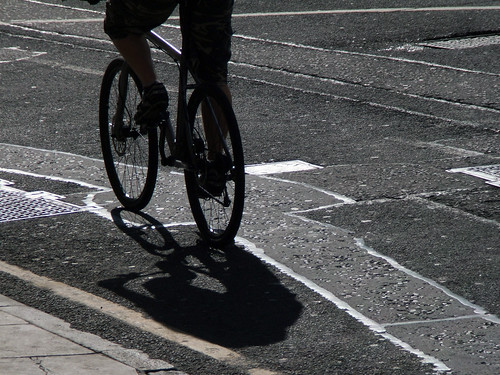
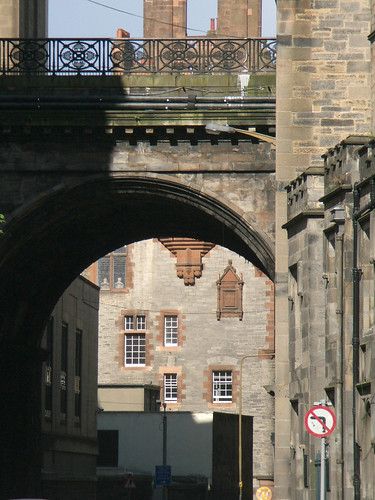
Left: urban landscape taken with the Fujifilm 0.76x Wide Conversion Lens WL-FXE01

0.76x Wide Conversion Lens WL-FXE01
This adaptor converts the wide end of the E550's zoom from 32.5mm to 24mm*; results are sharp, with a minimum of barrel distortion (curved lines at the edge of the frame). Despite the wide angle and the extra bits of glass placed in front of the lens, the adaptor isn't prone to lens flare. Vignetting wasn't noticeable on the shots I took.

*Field of view equivalent to 35mm camera lenses

The size of the wide lens does mean that it fouls the E550's viewfinder and built in flash.

As you'd expect with such a wide angle, depth of field is formidable at maximum aperture (f8), though all small-sensor cameras like the E550 have extended depth of field relative to 35mm or digital SLRs anyway.
From my limited tests, focus speed and accuracy seem unaffected.
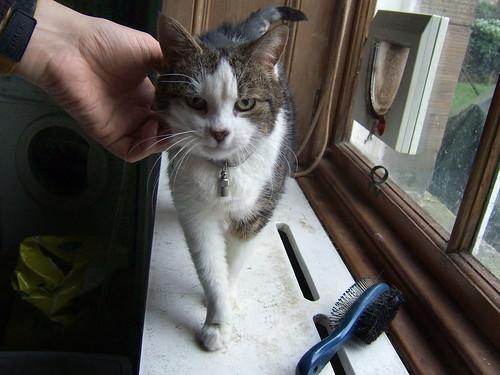
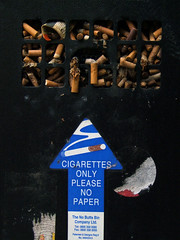
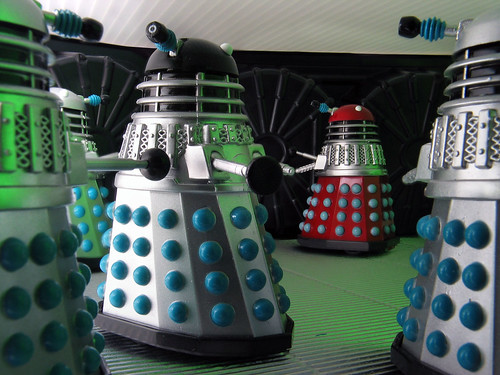
Close-focussing is even closer with the adaptor attached, though the greater angle of view means that objects may not appear much larger in the frame. However, the angular distortion and receding perspective of the wide-angle is useful for lending an impression of large scale to small objects; the Cybermen toys photographed at top were only 5" high, but appear to be life sized; the front figure was touching the front element of the adaptor.


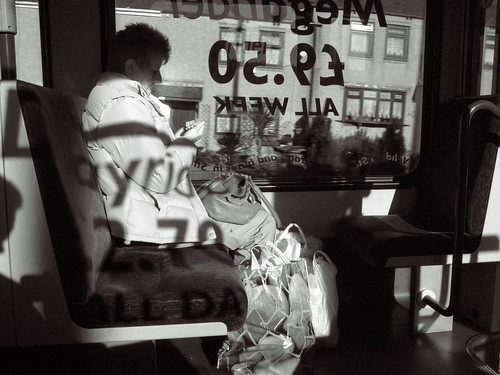
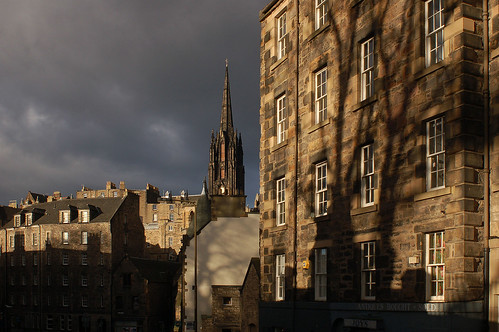
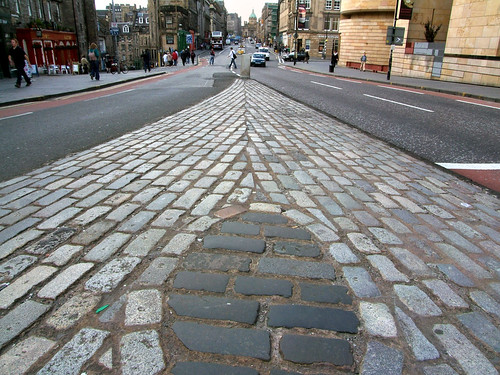
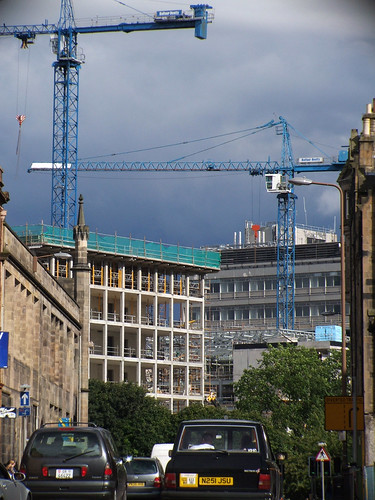
Above: superior depth of field: in this shot, the
Fujifilm 0.76x Wide Conversion Lens WL-FXE01 allows complete front to back sharpness at f8

Although Fuji warns against this, I did find that the wide adaptor produced reasonable results at all focal lengths, though the telephoto end is shortened considerably. While it's better to remove the adaptor for non-wide angle work, I'd not hesitate to use the zoom for a grab shot if time didn't allow for the removal of the adaptor.


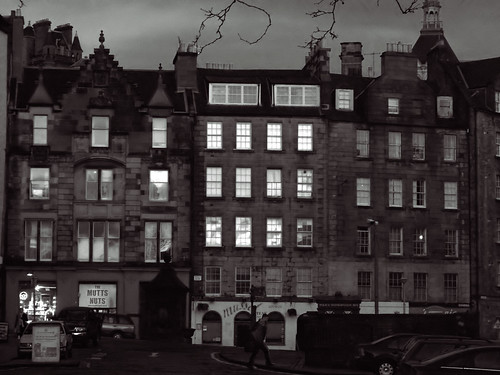
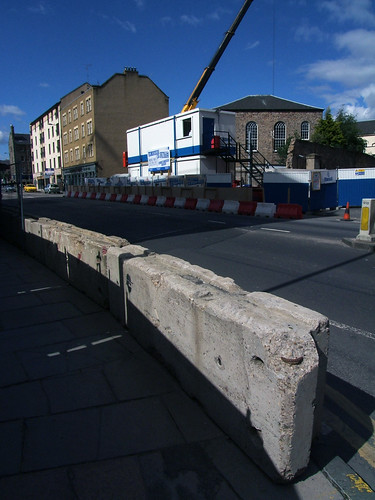
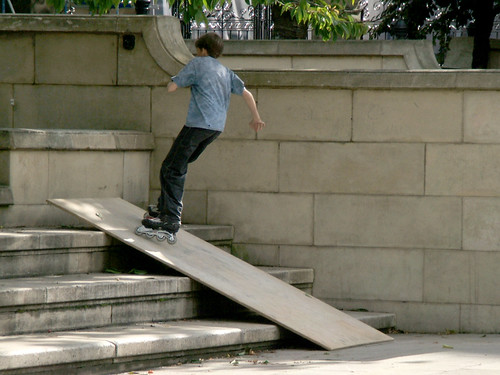
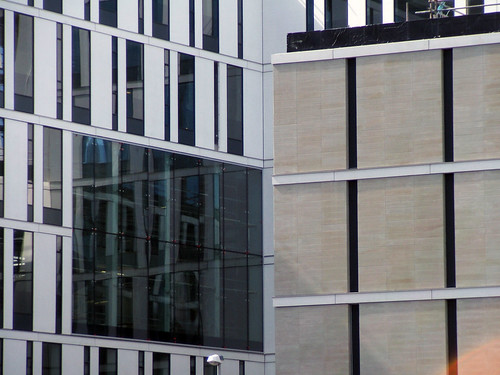
Above: grab shots taken with the wide(left) and tele (right) adaptors; focussing was not inhibited by either adaptor, an important factor for a camera as responsive as the E550.


Above left: excellent sharpness and contrast from the E550 with tele adaptor.
Above Right: don't zoom out! The vignetting visible as dark patches at the corners of the frame was not noticable in the camera LCD screen at the time.

1.92x Tele Conversion Lens TL-FXE01

This adaptor extends the telephoto end of the zoom from an effective 125mm to 250mm. Results were good; images were sharp, and there was no noticeable vignetting or image distortion. Focussing was not slowed.
The TL-FXE01 tele adaptor has to be used at the tele end of the zoom; zooming out only a little results in severe vignetting at the corners (see above, right), which is not always noticeable on the LCD screen when shooting.
As with all telephoto lenses, fast shutter speeds must be used to ensure a shake-free image. Because the aperture range of the E550 is limited at the telephoto end (f5.6-8 only), this adaptor would be of limited use to anyone trying to hand-hold the camera in low-light situations.


Above: though there's apparent flare at the bottom right of the frame, I couldn't repeat the effect by shooting into the light

Flare was generally excellently controlled, with one very small anomaly: when shooting a sharpness test with the sun at about 60% to the lens, an apparent flare spot appeared in the bottom right corner (small orange patch). Following this, I took a series of shots into the sun, but couldn't repeat the effect. If this was flare, then it only occurs when the light source is at a very specific angle; in general, the adaptor produced flare-free images under conditions that would have taxed my Nikon telephoto SLR lenses.


Above: The tele adaptor coped very well with shooting into the light; no flare is evident on all of the test shots bar one.

I bought the lenses as a kit from Amazon.co.uk. This cost me less for the adaptor and two lenses than some places charged for a single lens. The kit didn't show up in a general search, but required the specific part number B000GQ5EHM to be entered into the search engine. It's listed as an accessory for the later Finepix E900, but fits the E550 perfectly; in fact the packaging on the individual items listed them as for the E550.

The lenses do what they advertise, without degrading the image quality or performance of the E550. I don't use mine all the time, but on business trips when it's not practical to carry my SLR, they're a great way of extending the range of my "carry anywhere" camera.

Tuesday, July 24, 2007

Hurrah!

Sad as it sounds, a long standing ambition of mine as a Flickr'ite has been to get a viewing figure on my site equivalent to ten views per photograph. Normally I'm too profligate a poster for this to work; every time I get close I end up loading another month's photos, and the chase continues. The recent house move has put my posting far enough behind that at 12.33 today I made 1502 posts/15020 views. Now I can go back to making my model of Salisbury cathedral out of matchsticks with a light heart ;-)

Friday, March 16, 2007

Dalek Patrol Step-By-Step


Daleks on patrol
Canon G3, f8 @ 1/6sec, ISO 50
Flash and torchlight

I've been a member of the Flickr Dalek! group for a few weeks now, and was inspired by the group's description to try my hand at "Skaro-type scenery." I'd recently been watching the 1965 film Dr. Who And The Daleks, and was taken with the luscious blue-green lighting scheme used for the surface of the dead planet Skaro. Reproducing that look with only one flashgun would be tricky, plus there was the problem of setting up a suitable diorama.

But I kept my eyes open for suitable materials, and in the end the problem was solved using a toy Sonic Screwdriver, three celeriac roots and a very old baking potato...


Camera on a tripod with flash aimed at big sheets of green card to create the green lighting.

Set-up: the landscape is made out of pieces of celeriac and sprouting potatoes, resting on a sheet of heavy-duty display card, white side up. The vegetables were cut in half to give the impression of rocks embedded in snow. I was surprised at how few pieces (five halves of celeriac plus half a potato) were needed to make an effective diorama. A dusting of flour gives the impression of snow.
The green light was provided by bouncing an off-camera flash off some big sheets of fluorescent green paper. It's a Canon camera and flash linked by an old Nikon cable (therefore no TTL flash control), so I set the flash to manual mode and made test shots at different power settings till I got clear, but gloomy looking green illumination. The camera was set to f8@ ISO 50.


The camera is a Canon G3 compact with a lens adaptor and +4 close-up filter attached.

The blue spotlight on the Daleks came from a blue LED torch (appropriately, sold as a Dr. Who Sonic Screwdriver toy). I set the camera to manual, and fiddled with the shutter speed* until the blue light from the torch was bright enough - this LED torch is quite strong, so 1/6 sec was enough for a correct exposure.

*I needed to leave the aperture at the camera's maximum setting of f8 for two reasons; first, the flash was set up to give correct exposure at f8, secondly, f8 delivers maximum depth of field, making more of the model come out in sharp focus, which makes it seem bigger.


[Skaro+Patrol+000.jpg]

A shot as it comes out of the camera - in this case, focus is on the Daleks and the foreground is blurred.


I tried a number of different arrangements of Daleks and landscape. The camera could not keep the whole scene in sharp focus, so I took three shots of each set-up, one with focus on the extreme foreground, one focussing on the lead Dalek, and one on the far Daleks. In the sample shot (above) you can see that the foreground rocks and background Dalek are out of focus.

[Skaro+Patrol+00.jpg]

3 shots combined give sharp focus from front to back - the background hillocks and Dalek are overpainted with semi-transparent green to give the impression of a foggy atmosphere.

The next step (above right) was to paste foreground, midground and background shots into layers in a Photoshop file, then hide the out-of-focus parts of each layer using layer masks until only the sharply-focussed parts of each shot were visible. That creates a combined image where everything is in sharp focus from front to back.

Left: Detail showing the image with the mask (top) and without (bottom).

I also sampled the sky colour and used it to paint semi-transparent masks over the background Dalek and hills to give the impression of a slightly foggy atmosphere, and to make the foreground Daleks stand out.

[Skaro+Patrol+0.jpg]

The same scene with moon and hand-drawn snow added

The next step was to add wind-blown snow (above). For this I sampled colours from the picture, and on a new layer I drew little dashes over the picture with a Wacom tablet. I tried to make the colour of the flakes match the lighting of the picture. I then used Photoshop's Motion Blur filter to add a bit of "zip" to the flakes, as if they'd been caught in motion.
I added flakes on several layers, making the dashes fewer and bigger towards the foreground. The "closest" dashes had Gaussian Blur added to the Motion Blur, to give the impression they were out of focus because they were so close to the camera.
I also added the moon to the sky, using a green borrowed from the reflections on the hindmost Dalek. The moon was a black & white picture pasted into an alpha channel in Photoshop, then loaded as a selection and filled with a gradient (green-to-transparent).

[Skaro+Patrol+1.jpg]

Grain has been added in the sky to give the impression of distant snowflakes.

I decided the background looked too clean; there should be thousands of snowflakes in the sky. That's far too many to add by hand, so to give the impression of tiny flakes, I duplicated the image, flattening layers, and applied the Add Grain filter. This gave a gritty look to the sky, consistent with falling snow. However, the effect was all over the image, including the foreground where there would be no tiny flakes, so I copied the image and pasted it into a layer in the original file. I then used a layer mask to hide the foreground parts of the picture, letting the smooth, unfiltered image show through from beneath (above). I also added a bit of airbrushed "dust" to the base of the Daleks' skirts.

After all that, I decided the hand-drawn showflakes all looked to even and regular, giving the impression of something drifting gently through the air rather than being whipped along by a storm. So I made a copy of the file and re-drew the snowflakes, this time following the lines of the landscape and mixing the directions up a little, to give the impression of gusting snow (below).


The finished item: I really should have been working instead.


Saturday, March 10, 2007

E550 Update


Middlesbrough, March 2007

Six months on from first getting my Fuji Finepix E550, I thought I'd do an update on my first report. I'd been attracted to the E550 because of its fast startup time and minimal shutter lag, despite slight niggles about limited macro focussing and JPEG compression options.


First off: after six months, the E550 is still the camera I carry everywhere, and buying it has proved to be a very good decision. The quicker startup/shutter release has given me the ability to catch shots I'd simply have missed with my older cameras.


Top: Sascha the cat, Edinburgh, February 2007
Left: Harvey Nichols, Edinburgh, February 2007
Right, Manchester, February 2007


Sascha the cat here was endlessy pacing back and forth along this windowledge, but the E550 kept up with her just fine; similarly, the illicit shot of the mannequin taken in Harvey Nichols was made possible by the fact that the E550 starts up just about as quickly as a film compact. The picture of the drummer doesn't look as if it required split-second timing, but in fact it was taken on a packed shopping street; it had to be grabbed during a moment when the crowd parted.

There have been a couple of occasions when I've missed the better macro mode of my old Canons, but since I mostly use the E550 for candids, it's not really been an issue. Most of my macro stuff is done at home using the old Canon G3, but the E550 is still good enough to capture shots like these:


Left and Right: Edinburgh, November 2006

Neither are world-beating by the standards of modern digital compacts, but they'd still have been completely beyond the reach of my old film compacts.

JPEG settings - the E550 is a 6mp camera with an option to interpolate files up to 12mp. Now for me, 6mp is more than big enough, but annoyingly, there's no high quality JPEG compression option at that size; you have to go up to 12mp to get it. I'd read on DPReview that it was worth using the 12mp mode to get optimum image quality, but after a month or so of waiting ages for the bigger files to download from the camera (and open in Adobe Bridge) I gave up and went back to 6mp. For the uses I put my pictures to, I can't say I've noticed any adverse effects.
My only real niggle about the compression settings is that at 6mp, the digital zoom option is always on. I hate digital zoom and never use it, but I can't find a way of switching it off. Although there's a step between optical and digital zoom (the indicator "sticks" for a second when you reach the threshold so you don't just slide from one to another), I always worry that I'll end up in the digital zoom range without noticing.

To counterbalance the previous niggle, the E550's flash is, for my purposes, the best flash unit of any compact I've ever seen - that is, it suits the purposes of someone who hardly ever uses flash, and certainly doesn't want it firing accidentally when he's taking candids.
The E550's flash unit is a little pop-up unit that will only ever pop up if the user chooses to switch it on by hand. It's obvious when the flash is extended and when it isn't, so there's no chance at all of it going off when you don't want it.
Flash exposure is excellent (even close up) though it does lock the camera up for a second or so while it recharges after each shot. If you use flash a lot, this system would be annoying, but as far as I'm concerned, the only way they could improve it would be to remove the flash entirely and replace it with a hot shoe.

After some initial paranoia about dynamic range*, I'm now happy to use the E550 for the sort of fine-detail, extended tonal range "pseudo medium format" type shots I used to do with my old Canons. At the lowest sensitivity setting (ISO 80), the sensor produces smooth images that convert beautifully to black & white.

*Based on nothing at all, I had the feeling that Fujis "should" be more contrasty than Canons.


Sheffield, February 2007

If you look at the image above, the dynamic range is excellent, with detail preserved in both the highlights and the shadows areas. Up to ISO 200, there are no issues with image quality for my purposes, and noise is well controlled at ISO 400.


Grassmarket, Edinburgh, January 2007

The E550 has an ISO 800 setting that works at 3mp resolution only, but it's still perfectly usable, especially if noise-reduction is applied; this shot of the Grassmarket (above) was taken at ISO 800.


Left: Lille, December 2006
Right:
Edinburgh, January 2007

The E550's automatic exposure copes well enough even with difficult situations like the wok chef (above left). For more difficult subjects like the all-black public ashtray (above right), I switched to manual and used an incident meter to take an exposure reading.

So any actual problems?

Well, the E550's controls run the opposite way to the Canons I used previously, with the result that I'm always turning things up when I mean to turn them down and vice-versa.

I love the fact that the flash defaults to "off," but others might not.

I did have a weird problem with the camera conking out in mid-exposure which was solved by replacing the really cheap NiMh rechargeable batteries I'd been using with better quality ones (Jessops own brand); battery life has increased greatly, too - from about three days between charges to about three weeks.

Because I use cameras from three different manufacturers, I don't bother with camera drivers and software; I use a card reader and Adobe Bridge to preview the images I want to download from the card. If I accidentally apply Bridge settings (say rotation) to a file on the E550's XD card, there must be some sort of metadata conflict that causes the name of the affected file to be completely rewritten and the .JPG file extension to be lost.
The result is that the JPEG preview image disappears and Bridge (and Mac OS) classify the file as "Unix Executable" rather than any readable image file format. However, all is not lost - by copying the file to the hard disk and renaming it according to the Fuji convention - DSCFXXXX.jpg - it returns to life as a fully usable JPEG. Sadly, as far as I can make out, there's no way of renaming the original copy of the file on the XD card, so that remains unreadable by the camera.

Overall, my impression of the E550 is the same as it was a few months ago - it's a very fast and flexible camera, well suited to capturing fast action and candids, albeit with the odd little quirk. If you like the look of it, consider also the replacement model, the E900, which is available at a very reasonable price on Amazon right now.

More Tiny Daleks


Trial Dalek's-eye shot with Sigma 10-20mm zoom.
The foreground Daleks are within the lens's close-focus limit,
but remain relatively sharp due to depth-of-field (lens @ f22)

Further to my last post, I had a go at photographing close up with the "24mm" wide-angle adaptor on my Canon G3. The adaptor does wonders for the close-focussing distance (it can focus on objects that are touching the front element), but the micro-Daleks still weren't any larger in the frame than they had been with the Sigma 10-20mm zoom. Furthermore, the strong barrel dostortion caused by the adaptor is really prominent close-up - the end result is, it might be useful for the odd special effect (maybe even the view through a Dalek's eye-stalk), but when it came down to it, I got a much better result simply using the G3's own lens at the wide (35mm FoV) setting, with a +4 close up filter on the lens adaptor.


Dalek's eye view with Canon G3, 35mm FoV with +4 close-up lens @ f8
The narrower angle allows the foreground Daleks to fill the frame and then some.

Friday, February 16, 2007

Tiny Dalek Hordes


Dalek Hell, 2007
Canon G3, +4 Close-up lens


As a result of my recent Micro-Dalek-buying binge, I've been getting back into table-top photography. This was a favourite activity back in my teens when I got my first "proper" camera. It was my dad's old 1964 Canon FX SLR, which had neither TTL metering and nor even a multiple exposure lever.


My schoolmate Mark Wheeler's Japanese robot kit,
photographed circa 1985 with a 1964 Canon FX SLR, cheapo 35-135mm zoom
and two bursts of flash from an old Sunpak manual flash gun.

I nevertheless worked out a way of making multiple exposure shots of my mate's Japanese robot kits by shooting in total darkness, the camera mounted on a rickety tripod with the shutter locked open on "bulb", me stumbling around with an ancient flash gun in my hand, firing it more or less at random in what I hoped was the right direction. With no means of making an accurate exposure reading (or even of seeing what I was doing), I would get one barely usable shot out of every six rolls of film, but I probably had more fun with photography than I've ever had since.

Once I started working, I got a Nikon kit with proper macro lenses and even a multiple-TTL-flash set-up, but after an initial burst of enthusiasm it somehow all seemed too easy. On top of that, I realised that reliably shooting minatures was only the half of it; what I really wanted to do was create still photography versions of the sort of effects set-ups I saw in films. These relied on compositing a number of images onto a single frame, an activity could only be accomplished using incredibly expensive optical printing machines at that time.


Models shot on film with Nikon F4 and 28mm lens, circa 1994
Scanning and compositing done 1998


When I acquired my first Mac, with scanner and Photoshop, it occurred to me that I could start thinking about doing my own compositing; I had a go with some photographs I'd shot a few years earlier, but lack of time for model building rather put a stop to the whole business.

Switching to digital in 2001 sort of got me started again; the Canon G-series compacts I favour have a good built-in macro mode, plus the ability to take close-up filters. Indeed, I bought my original Canon G1 to photograph aircraft models for reference for a storyboarding job.


Radishes, 2006
Nikon D50, Sigma 18-50 f2.8 EX Zoom, SB-24 flash, Auto mode

Rather than getting back into effects-type model shots, I became interested in still-life, largely because I could quickly set-up shots around found objects (mostly leaves and foodstuffs) without needing time for model building (the results can be seen in my Filckr set, Macreaux). I did stray back to my roots a couple of times with whimsical photo-stories featuring toys; both Little Blue's Big Adventure and The Dalek Invasion Of Matt's Desktop, 2004AD involve not only close-up model photography, but effects work that would have been impossible for me a decade before.


From The Dalek Invasion Of Matt's Desktop, 2004AD
Canon G3; multiple shots combined to create artificial depth-of-field
Compositing and "exterminator" effects added in Photoshop 7

With Dalek Invasion, I also discovered the neat trick of taking the same shot several times at different focussing distances, then compositing the shots to make a single photo with a large apparent depth-of-field that's normally impossible to obtain when shooting miniatures (though the 1/8in chip on my Canon G3 meant I was getting pretty good depth-of-field to start with). Used along with a wide angle lens set at a low angle, this artifically extended depth-of-field makes miniature toys and models look life-size(see below).

If you look carefully at the in focus area in the shot above, it's actually nonsensical; instead of a plane of focus extending across the frame, it goes into the picture, keeping the Daleks in the background and the toys in the foreground equally sharp, while the wall to the right of the frame is always out of focus, even though it also extends front-to-back. The eye doesn't question it because it makes sense from a storytelling point of view; the important elements (toys and Daleks) are sharp, and the out-of-focus wall doesn't distract from them.

Again, lack of time put a stop to further playing about, but in the last month my new-found addiction to Product Enterprises Micro-Daleks has given me a ready source of models for new set-ups. For me, having stuff on hand to photograph is a big spur to getting stuff done.


Micro-Dalek Horde
Canon G3 with lens adaptor and +4 close up lens with 550EX flashgun,
f8 @ ISO 50 with TTL flash bounced off wall to left of shot


At about 2" tall, these Dalek toys are just large enough to allow for full articulation and a good level of detail. They're a little bit bigger than the Corgi ones I was playing with back in 2004, so they're easier to photograph. Even on the wide-angle setting, my Canon G3 can get in close enough for "upper body" shots. Some experimental group shots show that, even with foreground Daleks at frame-filling size, depth-of-field at f8 is reasonable. The shot above has some sharpening on the two closest Daleks, but even without it's much better than I expected; defocus is consistent with life-sized objects rather than the madly-shallow focus of the classic miniature shot. I reckon I could get complete front-to-back depth of field in two composited shots, when I'd anticipated needing four at least.


Nikon D50 with Sigma 10-20mm zoom, 10mm @ f22
SB-24 flash on Auto, bounced from wall on right


Almost as a joke, I tried my Sigma 10-20mm wide-angle, not expecting to get in very close, but thinking the angular distortion of the lens might yield interesting results. Then it occurred to me that at F22, the enormous depth-of-field of this lens might allow objects well within the minimum focussing distance to appear reasonably sharp. It worked better than I expected; you can make a Micro-Dalek fill the frame with reasonable defocus. The extreme angle of view really does make these miniature toys looks life size, though at f22 you get considerable image degredation (fringing) at the edge of the frame. The results were good enough to make me think about a close-up filter for this lens, though with a 77mm thread, it wouldn't come cheap*. In the meantime, I'll try the wide (FoV 24mm) adaptor on my G3, though I'm not sure what that will do to the close-focussing distance.

*And I've already blown the next three month's spending money on Daleks.


Saturday, February 03, 2007

It's Still Life, But Not As We Know It

I'm lucky enough to live a short walk from Edinburgh Central Library, which has, tucked away in a turret at the top of the building, one of the best arts libraries I've encountered. The photography section is excellent, and among its many gems are a number of books by the great Irving Penn. Having already borrowed Penn's 1990 retrospective Passage: A Work Record, I decided this time to go for Still Life. There's a lot of overlap between the two books, but Still Life devotes whole pages to pictures that appear as mere thumbnails in Passage.

Penn's still-lives broadly divide into two groups. There are those shot on commission for magazines (mostly Vogue), as illustrations for articles. These usually tell a story or express a theme; the items a lady would take to the theatre, cholesterol-rich foods, moisturising face-masks, frozen foods (above).

The second group are personal projects, groups of photographs themed around subject matter or technique; animal skulls from Prague Zoo, blocks of metal and sections of bone, photographic distortions made by painting with light, tulips.

What unites all the photographs is Penn's bold, modernist approach, his rigorously balanced compositions, his eye for form and texture. Everything he photographs looks lusciously glamorous, yet at the same time there's always a little nod to imperfection, wear and tear, decay; smeared lipstick, rusted metal, rotten apples and dying flowers all play their part in his compositions, even the commercial work. As T.S Eliot said of Webster, "...(he) saw the skull beneath the skin." That dash of memento mori is what saves his work from becoming an empty collection of beautiful surfaces.

The effect is at its most striking in Penn's food photography. He treats foodstuffs purely as raw material for compositions, without any concern for making them appetizing; raw frog's legs, oysters and live snails make up one composition, yet the photograph itself is still beautiful.

Fired up by all this, I decided to pick on some mushrooms bought at the farmer's market this morning; though somewhat limited by having only one on-camera flash (and a fifteen-year-old SB-24 at that), I'm pretty pleased with the results.


Mushrooms On The Loose

Nikon D50, Sigma 18-70 f2.8 EX, SB-24 Flash

F9 @ 1/125 sec, ISO 200, Auto Flash set for f8

Flash bounced off a white wall to the left

Background is an old baking tray


Friends Of Sigmund

You're never alone with an AF-Nikkor 80-200mm f2.8 AF Zoom.
The chap in red has my borrowed zoom lens; I took their photo with his.

Rather a nice, if unexpected, international encounter today at the end of Princes Street. I was grabbing a quick architectural detail shot with my big telephoto zoom (nicknamed "Sigmund" as in "Sigmund Freud would have a field-day") when I caught the eye of a nice non-English-speaking asian* chap with a D70, who pantomimed a request to try my lens. What the hell, I thought, so we swapped and I tried out his Nikkor 18-70 while he blasted away at distant objects with mine. Then I took their photo with my lens on his camera, we swapped back, they took my photo with them, and off they went, leaving nothing behind but the big grin on my face.

*Possibly Malay - I base this on the dimly-remembered notion that plurals in Malay are generated by repeating the word in question, and he kept saying "thankyouthankyou" in a rapid fire manner.

Saturday, January 13, 2007

Not Flockin' Bad...


Flock for Mac: start page (the default search engine is Yahoo!)
http://www.flock.com/

The other day I was looking for updates for the Flickr Uploadr and found this; a new browser with a hostage-to-fortune-name and built-in photo uploading features. Based around the notion of making all sorts of blogging, sharing and community activities more streamlined, it seems to be built around the same open-source core as Firefox and Safari. Flock therefore has a load of familiar features including tabbed browsing and web searches from the toolbar (though it seems to favour Yahoo! over Google). The word-processor style blogging tool interface is identical to the one in Firefox.


Uploading photos to Flickr using Flock's built-in uploader
(also works with Photobucket)

The stuff that interested me was the photo uploader and "photo-bar". The uploader will work with Flickr and Photobucket; you just drop photos from your hard drive into the uploader window, after which you can re-title, add captions and tags just like the Flickr Uploadr; once you click "upload" you get a second window offering the chance to add them to an existing set or create a new one*. You can re-order the photos in the list before uploading, a feature not offered by the Mac Flickr Uploadr. When I first tried Flock, I couldn't find a way of adding batch tags, but as of the Flock 0.7.12 update, I can add batch tags by selecting multiple photos in the ulpoader. Whether this is a new feature, or whether I just missed it the first time, I can't be certain.

*this is with Flickr; I don't have a Photobucket account.


Drag-and-drop photos from the photo-bar into blog comments
(on some sites you see the photos, in others you get the html)


Once photos are uploaded, they'll appear in the Flock photo-bar, along with everything else in your Flickr stream; you can then drag and drop the images into blog posts or comments. When you click on a photo thumbnail, three tiny icons appear, allowing you to pick whether you want to add a pic in Flickr's preset small or large sizes. If you want the photo in a different size, you can add a sizing instruction to the html tag (height="xxx" width="xxx" where "xxx" is the number of pixels) - the photo below is a Flickr large image that was scaled down to fit this blog's column width.


Flickr large image dragged and dropped from photo-bar,
then scaled down to fit Blogger column width

Flock impresses me enough that I've started using it regularly, though more as a substitute for Flickr Uploadr than Firefox. The usefulness of the photo-bar means it's taking over for blogging, but for general browsing it's so similar to Firefox that there's no point in swapping over, especially as I have all sorts of extensions installed which might or might not work with Flock assuming I knew how to import them and could be bothered doing it.

Pros:
  • Firefox-like interface and functions make it easy to get started
  • Runs smoothly
  • Photo upload from inside application
  • You can change order of photos in uploader
  • Supports batch tags
  • Photo-bar very handy

Cons
  • Yahoo! search engine

Available from www.flock.com and well worth a go. Like Firefox, it does take ages to self-configure when you first install it.


Thursday, January 11, 2007

No Added Colours Or Preservatives

Stormy Sky 1

Edinburgh Central Library from Candlemaker Row
Nikon D50 & 28mm f2.8 lens


Sometimes things just fall into your lap - I spotted this terrific sky on the way back from the shops yesterday. One of the few times I've uploaded shots to Flickr without any colour or contrast correction (though I did straighten the verticals and add a bit of sharpening).

Stormy Sky 2

Towards the Grassmarket from Candlemaker Row
Nikon D50 & 28mm f2.8 lens