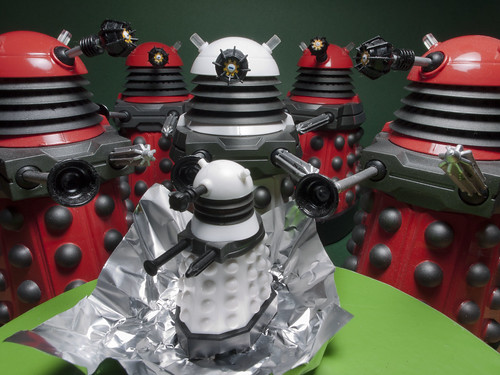
Red Movie Dalek in corridor set
I've had several requests to do something on the card-construction corridor set I made for my Product Enterprises Micro-Daleks. Having a proper set just adds another dimension when photographing models or toys, both in terms of composition and lighting effects (see below).
You can download the nets for this model as a set of
PDFs to print out - there are more details (and some basic instructions) further down this entry in the section marked "Assembly."
(Note: I've had some issues with the download link on this page, for reasons I can't figure out or fix; if the one above doesn't work, there's another one at the very end of the post and yet another about 2/3 down. If none of those work, mail me to report it and I'll just send a link.)

Although the set is just made of flat sections of card printed with black line drawings, it works surprisingly well under different lighting conditions.
I’d been trying to put together some sort of modular scale set for nearly a year, collecting bits of packaging and other materials that might be useful, but I never seemed to have the time for the sort of model building that would require extensive planning, assembly and painting. I wanted a quicker method to get started.

Plan view of the sections ("nets") used to make the corridor set. I built these in Adobe Illustrator.
I decided to see what could be done with paper construction. This was a quick option for me because I work almost every day with Adobe Illustrator, an application that's ideal for generating the "nets" (see above) needed to make 3D objects out of folded paper or card. Working in Illustrator, I could do a bit here and there in between my paid jobs; what's more, Illustrator can easily generate and duplicate complicated geometrical shapes, so I could add detail to the surfaces of the set at the drawing stage, without the need for additional work during construction.
I made nets for a corridor section and an angled joining section. Since I could print these out as many times as I liked, I could have as many sections as I was prepared to spend time building. I included the angled section for two reasons:
- By joining two corridor sections with an angled section, I got a more interesting set - effectively a curve around which lines of Daleks could emerge.
- Because of the angle, the inside wall of one straight corridor section would not be visible from the other straight section. Leaving out said inside wall cut down assembly time and gave me more flexibility in terms of camera angles and lighting.

The nets were broken down into sections small enough to fit on A4 sheets for printing out.
Printing
The difficult part of printing was finding a suitable card stock to print on.
UPDATE: it since occurred to me that you could print onto A4 self-adhesive labels and then affix the labels onto heavy card stock, mount board or even foamcore for a really rigid structure. If you try this, you'll still have to print the triangular reinforcing pieces that hold the corridor walls at an angle onto thin card or paper, as they need to fold tightly.
Really I wanted a heavyweight matt-surface printer card - 250-350gsm weight - which proved remarkably difficult to find. Heavyweight glossy photo paper is common, but the shiny surface would have caused too many problems with reflections when being photographed. I could get heavyweight inkjet/laser card on the Internet, but only in bulk, and I wanted to do some test construction before buying. In the end I managed to find some satin-surface 200gsm printer card in my local branch of Partners - a little lighter than I wanted, but good enough for a test.
I'd designed the nets so they could be divided into sections small enough to fit on to A4 sheets for printing. There were ten different sheets, some of which (such as end walls) had to be printed out more than once to make a complete corridor section.
The card would take laser or inkjet printing, and I decided to use my old laser printer for the trial run, as laser prints would not run on contact with the water-based Copydex rubber paste I intended to use.

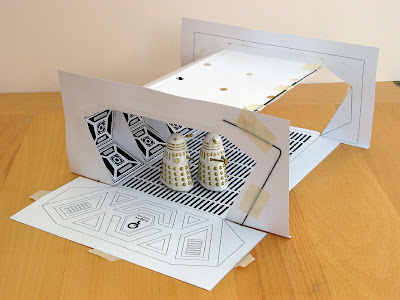
View of the three different corridor set sections built so far. The sections were left free standing so they could be put together in different combinations.
Assembly
If you want to have a go yourself, the nets can be downloaded as PDFs from
this page. The files come zipped, so you may need the free StuffIt Expander for
Mac,
PC or
Unix from
smithmicro.com. But be warned; so far I haven't had time to write proper assembly instructions, so there may well be a lot of guesswork involved!
I printed out the sections, scored along fold lines with a scalpel (the card was too thick to fold neatly otherwise) and cut out each section with a combination of scalpel (for precision work) and scissors (faster for the edges of flaps where accuracy is less important).
For the straight corridor sections I first glued the triangular flanges onto the walls. There are two types of flange; a free-standing double one (sheet 5 of the download) that appears three times on each corridor side wall, and a single one (sheet 6) that attaches to the ends of the side walls.
I then glued the walls, floors and ceilings together, forming a sort of tunnel, and added the end pieces last for rigidity. The angled joining section was done in a similar way; walls, floor & ceiling first, end pieces afterwards.
I cut hexagonal "skylights" out of the ceilings to let light in. In fact, the holes are so small that the effect is little more than cosmetic; in order to get a reasonable amount of light in through the holes, you'd need to put a lamp right over the set, and the light would show through the thin card of the ceiling. A simple way to avoid this would be to back all the sections with aluminium cooking foil before cutting out and gluing, but I only thought of this
after I'd finished construction.
I also found the 200gsm card was a little too thin to make the set completely rigid; using Copydex rubber paste to glue the set together didn't help, as Copydex gives a good bond on card, but suffers from shrinkage, so there's been some slight cockling of the card. The floor of the set does not sit flat, and on several shots I've had to use micro-Daleks as weights to flatten it out!
This problem could probably be overcome by gluing the floor section to a piece of thick mounting card (or even thin wood or plastic) with Spraymount before assembly.

View of the three different corridor set sections assembled for shooting.
This is the arrangement used for most of the shots above.
You can see cockling caused by glue shrinkage in the end section nearest the camera
The Sections
I'd originally planned to glue all three sections together, but once I had them assembled, I realised they were best left separate, so I could combine them in different arrangments.

Section 1: closed corridor section
Note the triangular struts arrayed inside the side walls; these help add rigidity to the walls, as well as making the corridor look more interesting.
The closed corridor section was the first one I built; it's a hexagonal tunnel designed for end-on shots where both walls of the corridor are visible. Despite leaving small openings in the ceiling, for photographic purposes the only usable illumination enters through the ends.

Section 2: angled joining section.
The angled section was a pig to design; working out two angled cross-sections of a hexagonal prism was a tricky job for someone with my shaky grasp of geometry, and it took me three goes to work out all the angles and lengths of side, and even then, the version you see here is very slightly "off" - the outer walls are a bit too big and don't fit flush with the end sections. I also thought I'd designed the section to angle at 22.5º (so that eight of them would form a complete circle) but the final product has ended up... not. Ho hum.
Nevertheless, The thing fits together well enough for shooting purposes, and does the job it was meant for (see below).
 The angled joining section is visible to the rear of this shot; putting a bend into the corridor not only makes the set look more interesting, but allows a wall of the far corridor section to be left open without the gap being visible.

Section 3: open-sided corridor section.
The missing wall allows for side-on camera angles, or for light to enter the corridor section if it's being used as a background. One end is closed with a "door" loosely held in place by tape.
The open-sided corridor section is the same as the first, just with one wall omitted. Because the thin card I'm using isn't terribly rigid, I taped lengths of semi-rigid floristry wire along the end walls and ceiling (see below). Backing these sections with rigid card before assembly would work better, but would make assembly more complicated.
Open-sided corridor section with end "door" opened.
The "door" at the end of this section is held in place with masking tape and can easily be removed.
Note the lengths of floristry wire needed to strengthen the end walls and ceiling.
Camera Angles and Lighting
There were two reasons for leaving this section open; first, it allows for side-on camera angles, and second, it allows light to enter the corridor section if it's being used as a background (see picture below).
I also added an end "door" to this corridor section. This is fixed loosely with tape, and can be removed (see below) to allow a wider range of camera angles.

Above left: open-sided corridor section with end "door" opened, allowing the camera to be positioned in a way that would be impossible in a closed section. Above right: the photo that resulted.
In the pictures above, you can see how the open side and back of the open corridor section allows camera positions that would be impossible in a closed section.

Example showing how the open-sided corridor section helps with lighting. The open section lets daylight in to the background of this shot.
The open corridor section is also helpful regarding lighting; the shot above was taken in daylight, which entered the set through the end of the closed corridor section (behind the camera) and through the open wall of the open corridor section at the far end (hidden by the turn in the corridor), ensuring that illumination was more or less even all along the set. If the background corridor section had been closed, the far end of the corridor would have been too dark to make out clearly.
 Using a desk lamp as a light source. Important: only ever use a lamp fitted with low-energy or fluorescent bulbs! Incandescent bulbs placed this close to a paper model would pose a serious fire risk!
If you're feeling more adventurous, you can try artificial light sources. An important safety warning though;
only ever use low-energy bulbs or fluorescent tubes when working close to paper models. NEVER use incandescent bulbs, the heat they give off poses a serious fire risk!
I've tried both battery-powered LCD lamps and (shown above) a neat desk lamp from Ikea that takes low-energy fluorescent tubes. These have the advantage of being cool (therefore safe to put near paper!) and also give a strong but diffuse illumination that looks great when it bounces off the corridor walls (see below)
 This is what the lighting looks like from inside the set. Ridley Scott eat your heart out.
To see the finished results, check out my
Dalek photos on Flickr.
PDF Link again
here.